
- Documentation
- Quick Start Guide
- Selenium Grid Configuration
- Auto Scaling
- Spot Instance Nodes
- Selenium Grid Integration
- Pre Launch API Integration
- Selenium Grid V4 Examples
- Selenium Grid V3 Examples
- Performance Testing
Ranorex Selenium Grid Example
This Ranorex selenium grid example uses a Gridlastic selenium grid for browser execution. The selenium grid hub endpoint and grid hub credentials are displayed after launching your Gridlastic selenium grid.
STEPS FOR RANOREX GRIDLASTIC CONFIG
1. In your Gridlastic grid configuration select "Disable Hub credentials" in the "Optional. Gridlastic Connect Hub Endpoint" secion to use a localhost grid endpoint via Gridlastic Connect (using Docker or native client). Start the grid.2. Ranorex supports localhost execution. So in this case we use a Docker Gridlastic Connect option but you can also use a native Gridlastic Connect client to create a localhost grid endpoint.
3. Install the latest version of Docker and run the “Docker Gridlastic Connect Localhost Hub Endpoint Quick Start” url found in your Gridlastic Dashboard.
4. Open the selenium grid console http://localhost:4444/grid/console and check that the grid is up and running
5. In Ranorex go to View->Endpoints and click Add Endpoint. Select WebDriver
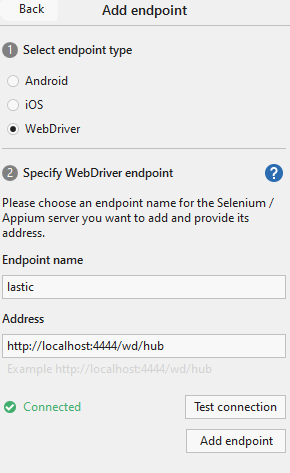
6. Enter Endpoint name and add the address as mentioned above
7. Click on Test Connection and then click Add endpoint
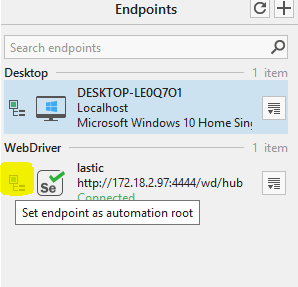
8. Click on Set Endpoint as root
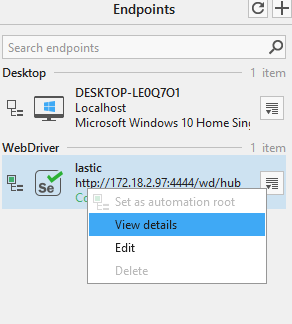
9. Then click on View Details
10. Then click on Add new configuration and provide the capabilities as below

NOTE: Gridlastic auto scaling requires all 3 test environment parameters platform, browser and browser version to be specified in each request in order to launch test nodes to fulfill test demand. Video recording is optional. See test environments for capabilities options.
It is important to ensure that "driver.quit()" is always called for proper test execution and creation of video recordings of failed tests.
Try our
SELENIUM GRID DEMO
Copyrights © 2013 - 2026 & All Rights Reserved by Gridlastic LLC.