
- Documentation
- Quick Start Guide
- Selenium Grid Configuration
- Auto Scaling
- Spot Instance Nodes
- Selenium Grid Integration
- Pre Launch API Integration
- Selenium Grid V4 Examples
- Selenium Grid V3 Examples
- Performance Testing
Note: if you are using Docker Desktop see our Docker containers implementing the native Gridlastic Connect client described below.
GRIDLASTIC CONNECT
Gridlastic Connect is a high performance encrypted tunneling software that enables you to test behind firewall web applications, on localhost or in containers. Starting one or hundreds of tunnels take just a few seconds and data transmitted is encrypted through industry-standard AES-256.
Starting a tunnel does not affect your selenium grid nodes capability to access any server on the internet at the same time as using one or many tunnels.
PERFORMANCE
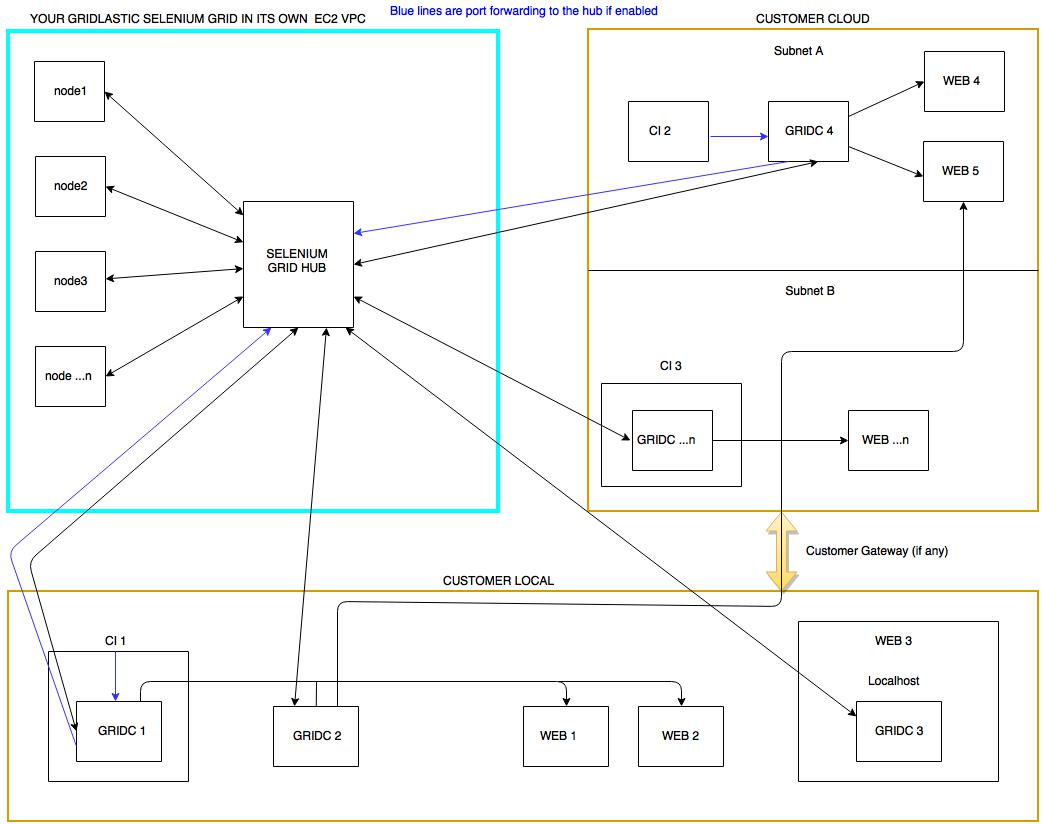
Gridlastic Connect can handle 200+ of simultaneous browser sessions over a single tunnel or many tunnels requiring only a small 4 GB RAM 2 GHz (linux) client machine on your side. We recommend using a Linux client machine for high performance but you can also use native clients for windows and macOS.FLOW CHART - Gridlastic Connect Tunnel Client (GRIDC)
Tunneling clients can be installed in multiple networks, on local machines, docker containers, CI servers or web servers, there is no limit of how many tunnel clients you connect either manually or programmatically. You could also use a dedicated machine for the tunnel client or scale with several client machines depending on your testing needs.In your tunnel client you create a mapping to your internal web servers using IP or DNS names. This will create endpoints that only your selenium grid nodes can access.
The tunnel client can also be configured to handle traffic to your selenium grid hub server securely via an encrypted tunnel (blue lines).
Click charts to enlarge.
DOWNLOAD TUNNEL CLIENT
New for client version 1.3 - API interface for getting and creating tunnels programmatically. The latest (client/server) version combination is (1.3/1.2).
| Download Link | Notes |
|---|---|
| Linux 64-bit - v1.3 | |
| Windows 64-bit - v1.3 | |
| Mac OS 64-bit - v1.3 | Note: regarding Apple introduced new notarization requirements starting with macOS 10.15 “Catalina”, the Gridlastic Connect tunnel client will not work if you manually download it through a browser. We are working on a repackaging solution for this problem and in the mean time you can download the native client using curl like:
curl -O https://www.gridlastic.com/downloads/c2/gridc-1.3-darwin_64.tar.gz |
INSTALLATION
1. Download and unzip your tunnel client liketar xfvz gridc-1.3-linux_64.tar.gz2. After extracting, go to the install directory and modify the sample configuration file gridc.cfg with your Gridlastic Connect subdomain (note: different from your grid hub subdomain, see your dashboard of your running grid)
3. Start the tunnel service using your Gridlastic selenium grid credentials displayed in your dashboard. Provide the username/access key as environmental values or directly on the CLI.
Linux/MAC
export GRIDC_USERNAME={your Gridlastic grid username}
export GRIDC_ACCESS_KEY={your Gridlastic grid access_key}
chmod +x gridc
./gridc -config=gridc.cfg start tunnel-1 tunnel-2
OR
./gridc -username=USERNAME --password=ACCESS_KEY -config=gridc.cfg start tunnel-1 tunnel-2WINDOWS CMD EXAMPLE:
set GRIDC_USERNAME={your Gridlastic grid username}
set GRIDC_ACCESS_KEY={your Gridlastic grid access_key}
"C:\gridc\gridc-1.3-windows_64\gridc.exe" -config "C:\gridc\gridc-1.3-windows_64\gridc.cfg" start tunnel-1 tunnel-2
When you start the client it will display the tunnels created in the terminal. You might want to resize the terminal to display/refresh output, specially if the status are stuck on connecting for more than 10 seconds.
EXAMPLE CONFIGURATION FILES
gridc.cfg, is a YAML file so be careful with spaces when editing.EXAMPLE 1 - test local web applications serving http via subdomain endpoints
server_addr: {your_gridlastic_connect_subdomain}.gridlastic.com:443
tunnels:
  TUNNEL-1:
    subdomain: "unique-subdomain-1"
    proto:
      https: 80
  TUNNEL-2:
    subdomain: "unique-subdomain-2"
    proto:
      https: 10.0.0.83:80
The subdomain must be a valid single DNS string (no dots and 3-63 characters). If this tunnel client is started using the "start" command that specifies what tunnels in the configuration file that will be created, like
export GRIDC_USERNAME={your Gridlastic grid username}
export GRIDC_ACCESS_KEY={your Gridlastic grid access_key}
./gridc -config=gridc.cfg start TUNNEL-1 TUNNEL-2
OR start all tunnels
./gridc -config=gridc.cfg start-allthe output would be:
gridc

Tunnel Status                 online
Version (client/server)       1.3/1.2
Forwarding                    https://unique-subdomain-1.your_gridlastic_connect_subdomain.gridlastic.com:8091 -> 127.0.0.1:80
Forwarding                    https://unique-subdomain-2.your_gridlastic_connect_subdomain.gridlastic.com:8091 -> 10.0.0.83:80
In your selenium test scripts you use
driver().get("https://unique-subdomain-1.your_gridlastic_connect_subdomain.gridlastic.com:8091"); // port 8091 for https.
driver().get("https://unique-subdomain-2.your_gridlastic_connect_subdomain.gridlastic.com:8091");
Note: proto can be http or https. http endpoints are accessed via port 8090 and https on 8091. One advantage with this setup is that you can test https only functionality, like service workers, as the localhost origin is regarded as secure/trustworthy by modern browsers and your grid nodes can access this endpoint with https since all endpoints on port 8091 are deployed using a valid Letsencrypt SSL certificate.
Docker Containers
Also, if you are deploying your website in docker containers or kubernetes clusters, you can start one or many tunnels in each container and select any unique DNS valid sub-subdomain reference you want for each tunnel. Example: if you in your pipeline deploy 10 containers with each container having 10 specific web application test configurations, you can programmatically create 100 unique tunnel/endpoints, one to each specific test configuration, in seconds. There is no limit to how many tunnels you create using subdomains, just make sure each subdomain reference is unique per selenium grid.EXAMPLE 2 - test local https sites and networked services that runs over TCP
server_addr: {your_gridlastic_connect_subdomain}.gridlastic.com:443
tunnels:
  TUNNEL-1:
    remote_port: 9000
    proto:
      tcp: 443
  TUNNEL-2:
    remote_port: 9001
    proto:
      tcp: 10.0.0.83:443
You can specify TCP ports in the interval 9000-9999. Note that this method is for https sites that can be reached using a direct IP using a valid/invalid (expired) or self signed certificate. For production/external https sites, see note below.
Start the client like:
export GRIDC_USERNAME={your Gridlastic grid username}
export GRIDC_ACCESS_KEY={your Gridlastic grid access_key}
./gridc -config=gridc.cfg start TUNNEL-1 TUNNEL-2
the output would be:
gridc

Tunnel Status                 online
Version (client/server)       1.3/1.2
Forwarding                    tcp://your_gridlastic_connect_subdomain.gridlastic.com:9000 -> 127.0.0.1:443
Forwarding                    tcp://your_gridlastic_connect_subdomain.gridlastic.com:9001 -> 10.0.0.83:443
In your selenium test scripts you use
driver().get("https://your_gridlastic_connect_subdomain.gridlastic.com:9000");
driver().get("https://your_gridlastic_connect_subdomain.gridlastic.com:9001");
You also have to add code to handle the ssl certificate prompt, since the domains will not match and the browser will display "non secure" in this context. To avoid this issue use a proxy integration with Squid Proxy. If you do not define a remote_port from the interval 9000-9999, one is automatically assigned randomly from this interval upon client start and you can get the tunnel specifics via the API.
NOTE: If you have problems getting to your sites because of re-directs/re-writes/dns or other resource loading issues, use a proxy integration with Squid Proxy. Also, consider using a simpler integration approach to using a tunnel by using selenium grid proxy routing.
TUNNEL CLIENT ACCESS
On what ever machine you install a tunnel client, that machine of course needs to have access to the mapped target servers. The target servers do not need to be operational when the tunnel client is started, tunnels are created independently and are active as long as your tunnel client is running.SCALE
If you have several tunnel clients you need to coordinate subdomains and ports mapped to avoid conflicts or simply create tunnels programmatically. Several tunnel clients or tunnels can have a mapping for the same web server target address using several different domains/ports. This is how you can scale with several client machines/tunnels accessing the same web service. You would then need to control how many browser sessions uses what tunnel endpoint in your selenium test script code. If you plan to run more than 10 sessions in parallel then you might need to increase the max open file limit on your system.CONFIGURE THE TUNNEL CLIENT
Editing the tunnel client gridc.cfg file requires a stop/start of the tunnel client but takes just a few seconds to start up again. Note: you can have several tunnel clients running on the same machine so you do not need to map your entire test environment in a single configuration file. You can also programmatically create tunnels and retrieve information about tunnels already created.If the client is terminated all tunnels created via that client are removed by the server, regardless if they were created from the configuration file or via the API. Unlike tunnels created via the client REST API, tunnels created from a configuration file will be re-created automatically if the selenium grid is terminated and started again while the client is running.
The configuration file is always required to start a client but does not need to contain any tunnel definitions but must contain the server address like:
server_addr: {your_gridlastic_connect_subdomain}.gridlastic.com:443
A client with no tunnels defined in the configuration file is started using the "start-all" command like:
export GRIDC_USERNAME={your Gridlastic grid username}
export GRIDC_ACCESS_KEY={your Gridlastic grid access_key}
./gridc -config=gridc.cfg -api 3030 -hub 4444 start-all
STOP THE CLIENT
Stop the tunnel client with “ctrl -c” or simply kill the gridc process when running in background. There is a server/client heartbeat that will cleanup all tunnels created with the client.CORPORATE PROXIES
If the machine your are running the tunnel client on cannot directly access the internet and your grid hub server, you can use an internal corporate proxy by adding the "http_proxy" parameter to the tunnel client gridc.cfg file as shown in the example below:
server_addr: {your_gridlastic_connect_subdomain}.gridlastic.com:443
http_proxy: http://corporate-proxy-domain:3128
tunnels:
  my-tunnel:
    subdomain: my-subdomain
    proto:
      https: 80
If that machine also cannot access your test sites without going through a corporate proxy, you can create a tcp tunnel to it and use a selenium proxy in your selenium code like:
server_addr: {your_gridlastic_connect_subdomain}.gridlastic.com:443
http_proxy: http://corporate-proxy-domain:3128
tunnels:
  tunnel-tcp:
    remote_port: 9797
    proto:
      tcp: corporate-proxy-domain:3128
Add this to your selenium code:
String proxy_server = "your_gridlastic_connect_subdomain.gridlastic.com:9797";
org.openqa.selenium.Proxy proxy = new org.openqa.selenium.Proxy();
proxy.setHttpProxy(proxy_server).setFtpProxy(proxy_server).setSslProxy(proxy_server);
capabilities.setCapability(CapabilityType.PROXY, proxy)
Note: the port 9797 in this case is a just an example port, choose any available port in the interval 9000-9999. You can now use your internal ip/dns server names in your selenium test scripts just like you would running locally like:
driver().get("https://www.google.com");
ACCESS YOUR SELENIUM GRID HUB
The tunnel client can also be configured to handle traffic to your selenium grid hub server securely via an encrypted tunnel on any port you choose. This could be specially useful if your test framework does not support accessing the selenium grid hub via https or do not support the use of username/access key in the hub endpoint url. Activate this routing with an extra command line parameter “-hub” like:Native
export GRIDC_USERNAME={your Gridlastic grid username}
export GRIDC_ACCESS_KEY={your Gridlastic grid access_key}
./gridc -config=gridc.cfg -hub 4444 start tunnel-1
Docker
docker run --rm -it -p 4444:4444 --name gridc-hub-endpoint -e GRIDC_ENDPOINT_SUBDOMAIN= -e GRIDC_USERNAME= -e GRIDC_ACCESS_KEY= -e GRIDC_HUB=4444 gridlastic/docker-gridcYour tunnel client machine will now route traffic on gridc_client_machine_IP:4444 or localhost:4444 to your selenium grid hub. In your selenium test code you would specify
"http://USERNAME:ACCESS_KEY@gridc_client_machine_IP:4444/wd/hub"or if your test code runs locally like on a CI server
"http://USERNAME:ACCESS_KEY@localhost:4444/wd/hub”or without grid credentials if diasbled in your grid configuration
"http://localhost:4444/wd/hub”instead of
"https://USERNAME:ACCESS_KEY@HUB_SUBDOMAIN.gridlastic.com/wd/hub"accessing your selenium grid hub directly.
The hub routing can also run standalone like
export GRIDC_USERNAME={your Gridlastic grid username}
export GRIDC_ACCESS_KEY={your Gridlastic grid access_key}
./gridc -config=gridc.cfg -hub 4444
RUN THE TUNNEL CLIENT LONG TERM
If you terminate your Gridlastic selenium grid with tunnel clients running, they will keep running and will connect again automatically as soon as your selenium grid is started again, re-creating any tunnels defined in the configuration file. Any tunnels created via the API are lost.You might want to run the client without the UI window like
LINUX
export GRIDC_USERNAME={your Gridlastic grid username}
export GRIDC_ACCESS_KEY={your Gridlastic grid access_key}
./gridc -log=stdout -log-level ERROR -config=gridc.cfg start tunnel-1 > /dev/null & disown
Note: to run the client in the background "-log=stdout" is required. The level of messages to log, one of: DEBUG, INFO, WARNING, ERROR. Default is DEBUG. Note: it is normal to see some errors upon tunnel closing a session, due to individual network specifics, while your tests are processed without errors.
DYNAMIC TUNNEL CREATION VIA API
You can create new tunnels or retrieve information about already created tunnels via the client REST API (new for client version 1.3). The API is specific to the client binary and disabled by default. Enable the API by adding the "-api" parameter with a local port not in use by another gridc binary or local service, like:
export GRIDC_USERNAME={your Gridlastic grid username}
export GRIDC_ACCESS_KEY={your Gridlastic grid access_key}
./gridc -config=gridc.cfg -api 3030 start-all
The configuration file is always required to start a client but does not need to contain any tunnel definitions but must at a minimum contain the server address like:
server_addr: {your_gridlastic_connect_subdomain}.gridlastic.com:443
A client with no tunnels defined in the configuration file is started using the "start-all" command.
In this case the base url is
http://127.0.0.1:3030/apiBecause it is served on a local interface, the API has no authentication. Request parameters must be encoded to the API using application/json. All responses returned by the API are application/json.
GET ALL ACTIVE TUNNELS
GET /api/tunnels
Lists all tunnels created using this gridc binary, either created via the API or from the gridc.cfg configuration file upon start.Example:
curl http://localhost:3030/api/tunnelsResponse:
{
  "tunnels": [
    {
      "name": "tunnel-1",
      "uri": "/api/tunnels",
      "url": "http://test.{your_gridlastic_connect_subdomain}.gridlastic.com:8090",
      "proto": "http",
      "addr": "127.0.0.1:80"
    },
    {
      "name": "tunnel-2",
      "uri": "/api/tunnels",
      "url": "https://test.{your_gridlastic_connect_subdomain}.gridlastic.com:8091",
      "proto": "https",
      "addr": "127.0.0.1:80"
    }
  ]
}
GET TUNNEL BY NAME
GET /api/tunnel
Example:curl http://localhost:3030/api/tunnel?name=tunnel-1Response:
{
  "tunnels": [
    {
      "name": "tunnel-1",
      "uri": "/api/tunnel",
      "url": "http://test.{your_gridlastic_connect_subdomain}.gridlastic.com:8090",
      "proto": "http",
      "addr": "127.0.0.1:80"
    }
  ]
}
CREATE TUNNEL
POST /api/tunnel
If a request is successful with the status "created", the response contains the url assigned to the tunnel.Example subdomain tunnel
curl -X POST localhost:3030/api/tunnel -H "Content-type:application/json" -d "{\"name\": \"unique-tunnel-name\",\"addr\": \"8080\",\"subdomain\": \"unique-subdomain-name\",\"proto\": \"https\"}"
Response:
{
    "request_id": "50d9f788d314f7c0",
    "name": "unique-tunnel-name",
    "url": "https://unique-subdomain-name.{your_gridlastic_connect_subdomain}.gridlastic.com:8091",
    "status": "created"
}
Note: The tunnel name and subdomain name can be the same. If the subdomain reference is left out, the tunnel name is used as subdomain. The subdomain must be a valid single DNS string (no dots and 3-63 characters) and unique to the server (unique among all running gridc clients). The tunnel name must only be unique against the specific gridc binary.
Example TCP tunnel
curl -X POST localhost:3030/api/tunnel -H "Content-type:application/json" -d "{\"name\": \"unique-tunnel-name\",\"addr\": \"8080\",\"remote_port\": 9777,\"proto\": \"tcp\"}"
Response:
{
    "request_id": "50d9f788d314f7c0",
    "name": "unique-tunnel-name",
    "url": "tcp://{your_gridlastic_connect_subdomain}.gridlastic.com:9777",
    "status": "created"
}
Note: Request a random port in the interval 9000-9999. Keep trying until an available port is found and the status returned is "created". Replace the "tcp" reference of the url in the return result with either http or https depending on what protocol your target website serves. Also, when testing a local https site via a TCP tunnel, you also have to add code to handle the ssl certificate prompt, since the domains will not match and the browser will display "non secure" in this context. To avoid this issue use a proxy integration with Squid Proxy.
SQUID PROXY INTEGRATION
Note: there is also a Docker implementation of the Squid Proxy Integration described below.Squid proxy is one of the most popular open source proxies available today. Gridlastic Connect can be used to tunnel your selenium grid nodes through your own Squid proxy or through any other proxy of your choosing like a corporate proxy. The main advantage is that you do not need to map your internal test servers in a configuration file but just map to a proxy and then use whatever internal ip/dns etc in your selenium test script.
Squid proxy also supports web sockets and can be installed on many different operating systems. If you are unable to specify a direct ip to your internal test site or have problems getting to your internal sites because of re-directs/re-writes/websockets or other resource loading issues, using a proxy setup can solve these problems.
Click chart to enlarge.

Sample configuration file (Squid proxy running on the same box as the tunnel client, recommended):
server_addr: {your_gridlastic_connect_subdomain}.gridlastic.com:443
tunnels:
  squid1:
    remote_port: 9999
    proto:
      tcp: 3128
Start the tunnel client like
export GRIDC_USERNAME={your Gridlastic grid username}
export GRIDC_ACCESS_KEY={your Gridlastic grid access_key}
./gridc -config=gridc.cfg start squid1
the output would be:
gridc

Tunnel Status                 online
Version (client/server)       1.3/1.2
Forwarding                    tcp://your_gridlastic_connect_subdomain.gridlastic.com:9999 -> 127.0.0.1:3128
The endpoint "your_gridlastic_connect_subdomain.gridlastic.com:9999" is accessible only by your Gridlastic selenium grid nodes. Note: port 9999 is just an example, select any not in use by another tunnel in the interval 9000-9999 or leave empty for random assignment by the server and then retrieve the tunnel specifics via the API programmatically.
To tunnel your tests through to your Squid proxy, create a selenium proxy using this endpoint and pass into the webdriver as a capability like in the java example below:
String proxy_server = "your_gridlastic_connect_subdomain.gridlastic.com:9999";
org.openqa.selenium.Proxy proxy = new org.openqa.selenium.Proxy();
proxy.setHttpProxy(proxy_server).setFtpProxy(proxy_server).setSslProxy(proxy_server);
capabilities.setCapability(CapabilityType.PROXY, proxy)
You can now use your internal ip/dns server names in your selenium test scripts just like you would running locally like:
driver().get("https://my_internal_dns.com");
Squid is easy to install, see here for Squid proxy installation instructions.
SSL CERTIFICATES
If testing a site serving self signed https (tcp port forwarding) include the following in your selenium code to make the browser continue on ssl certificate prompts:Chrome (options)
options.addArguments("ignore-certificate-errors");
Firefox (profile)
profile.setAcceptUntrustedCertificates(true);Internet Explorer
((RemoteWebDriver) driver()).findElementByLinkText("Continue to this website (not recommended).").click();
OR
driver().findElement(By.name("overridelink")).sendKeys(Keys.ENTER);
MAX OPEN FILE LIMIT
You might have to increase the max open file limit on your machine if you run more than 10+ sessions in parallel like:LINUX
ulimit -n 65536and then re-start both your proxy like Squid and your Gridlastic Connect client(s) (gridc). Verify that the "Max open files" "Soft Limit" has adopted your new max limit like:
// Replace [PID] with values from your proxy and gridc processes.
cat /proc/[PID]/limits
A good practice is also to regularly re-boot your client machine to free up resources.
WINDOWS
On Windows these limits are hard coded but you can scale using more windows machines, each using a Gridlastic Connect client but mapped to a different port. This way you would have a tunnel to each machine and use a parameter for the endpoint to even out your tests per endpoint.
TROUBLESHOOTING
* If your gridc client launched from the CLI is stuck on "reconnecting", the cause could be:1. Your Gridlastic selenium grid is not up and running. Start the grid in your dashboard.
2. Try to resize the terminal to display/refresh output.
3. The configuration file has non valid YAML format or the server address with your Gridlastic Connect subdomain is not correctly specified.
4. If you added IP whitelisting to the Gridlastic Connect endpoint, make sure your gridc tunnel client is running on a machine with the whitelisted IP.
5. A tunnel client will not start if the configuration file contains tunnel configurations conflicts, such as subdomains already in use by another tunnel. To debug see how to run the client with logging. If you have many teams/users creating tunnels with many tunnel clients you have to coordinate specifically defined subdomains or TCP ports conflicts manually. If so it might be easier to start clients with no specific tunnel configurations and then create tunnels programmatically.
* If you are having problems connecting to internal sites that are using re-directs etc, use a proxy setup with Squid Proxy like described here.
* If you get test timeouts using a tunnel with more than 10 parallel sessions, then you might need to increase the max open file limit on your system.
TIPS
Although you could run all your test traffic through Gridlastic Connect tunnels we still recommend to access your public test servers directly to minimize tunnel traffic when practical. Starting a tunnel does not effect your selenium grid nodes capability to access any server on the internet.Try our
SELENIUM GRID DEMO
Copyrights © 2013 - 2026 & All Rights Reserved by Gridlastic LLC.